Feeds:
Posts
Comments

Archive for the ‘Integrated Services (ETL)’ Category

Pre-requisites:

Download and install SSIS DevOps Tools from https://marketplace.visualstudio.com/items?itemName=SSIS.ssis-devops-tools

Set up an agent pool (self-hosted) on your device or server. Go to the Project Settings then select Agent Pools then click on new agent.

A pop up menu will appear. Follow the instructions to set up the agent pool.

Create the agent

PS C:\> mkdir agent ; cd agent
PS C:\agent> Add-Type -AssemblyName System.IO.Compression.FileSystem ; [System.IO.Compression.ZipFile]::ExtractToDirectory(“$HOME\Downloads\vsts-agent-win-x64-2.210.1.zip”, “$PWD”)
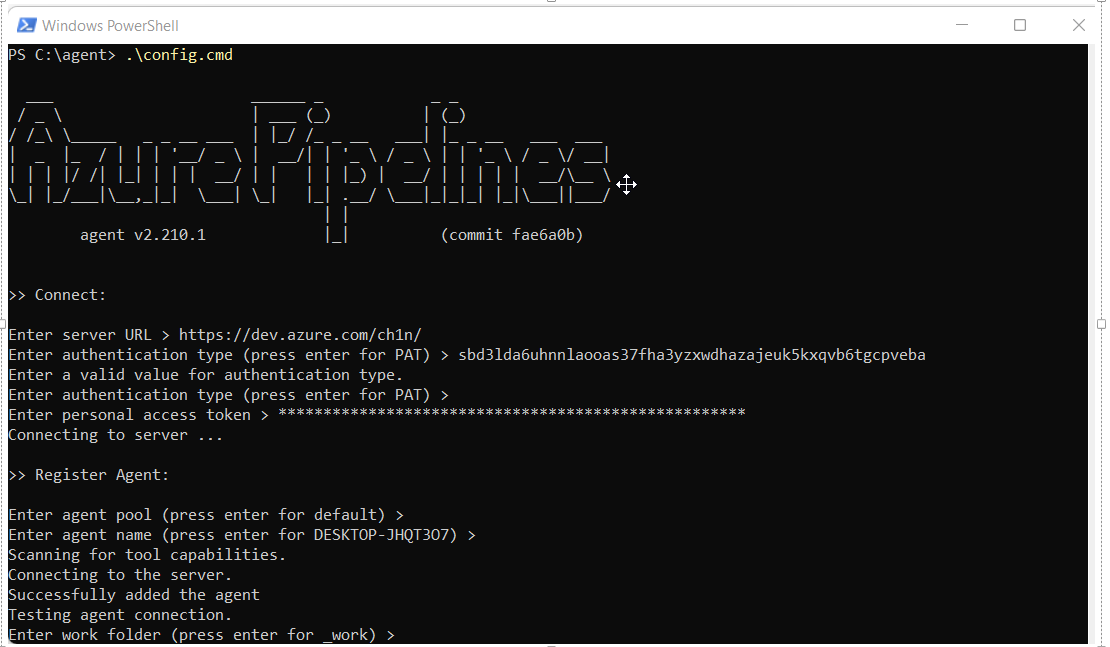
Configure the agent

PS C:\agent> .\config.cmd

Optionally run the agent interactively

If you didn’t run as a service above:

PS C:\agent> .\run.cmd

Steps:

  1. Create a build pipeline
  2. Enable continuous integration on the build pipeline
  3. Create a release pipeline
  4. Enable continuous delivery on the release pipeline
  5. Test by adding an SSIS package into the project then create a pull request so that the build pipeline will be triggered followed by release pipeline upon a successful build. The new SSIS package would be deployed to the Integration Services Catalog on the destination server. Configure the project environment for DEV and then configure the project parameters.

Steps to create a build pipeline:

Create a new build pipeline

Select “Use the classic editor”

Choose “Azure Repos Git” as the source for your repository

Start with an empty job

Select “Azure Pipelines” as the agent pool for your build pipeline.

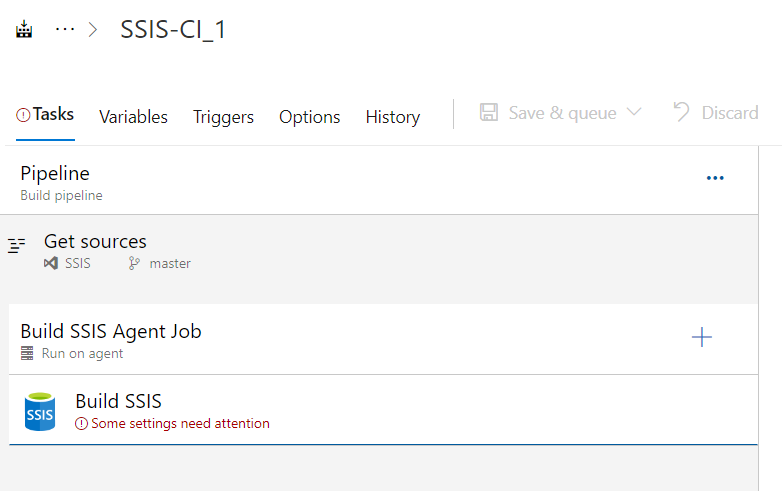
Change the display name of the build agent job.

Add a task and then search for “SSIS”

Add the SSIS Build task

Set the Project path.

Add another task to publish the build artifacts.

Change the artifact name or leave it as “drop”

Save and run the build pipeline.

Enable continuous integration on the build pipeline and then save it.

Steps to create a release pipeline:

Create a new release pipeline.

Select an empty job.

Set the stage name to DEV and then close the menu.

Add an artifact

Select the build pipeline you created previously.

Click on “1 job, 0 task” link.

Select “Default” as the agent pool for the release pipeline.

Add “SSIS Deploy” task.

Navigate to where the project ispac is located.

Choose SSIS as the destination type.

Add a variable for the server name and then set the scope to DEV.

Go back to “Tasks” and then set the Destination Server to the variable $(ServerName)

Set the Destination Path to the destination folder where the source file will be deployed to. For example:

  1. /SSISDB/<folderName>/[<projectName>]
  2. \\<machineName>\<shareFolderName>\<optionalSubFolderName>

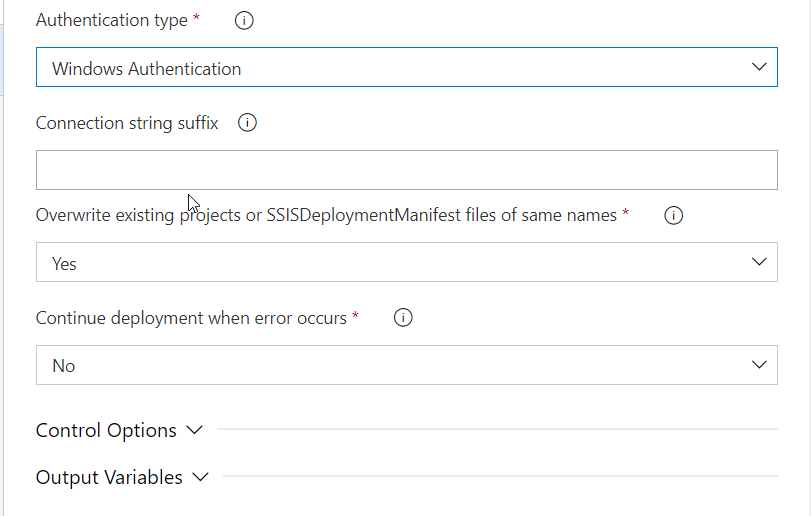
Set the Authentication Type to Windows Authentication.

Rename the pipeline name and then save.

Create a new release

The Release-1 has been created. Click on it.

Deploy the release pipeline.

Enable the continuous deployment trigger.

Clone the DEV release stage for TEST and then configure the variables on the TEST stage.

Set pre-deployment conditions

Read Full Post »

I thought my disk space was low so I cleaned up to have more space, as well as restarted my PC but the error persisted.

Googling found me the link below, which provided a solution to the problem.

Solution(s):

  1. Do a cleanup of the hard drive
  2. Change the location for the buffer files by setting the BLOBTempStoragePathand BufferTempStoragePath properties of your data flow task

http://techknowstat.blogspot.com/2014/05/error-buffer-manager-cannot-extend-file.html

Thanks to the above blogger 🙂

Read Full Post »

I have an SSIS package that does SCD type 2, i.e. when there is an update, it inserts a new record and then expires the previous record. In testing it, I updated one record but when the package was run, the INSERT has failed with the error saying that the primary key constraint has been violated and cannot insert duplicate key in object. I checked my code and the checksum making sure that the incoming record and the existing record have different checksums. Indeed they both have different checksums. So this does not make any sense.

I talked about this with my colleague and he Googled it and found a solution (https://stackoverflow.com/questions/20153310/identity-not-generating-the-seed-and-increment-correctly)  that worked for my case. Thanks to the user that has shared the fix. 🙂

The solution is to reseed the table by running the following SQL:

DBCC CHECKIDENT(‘Id_Table’, RESEED, 0)    —- Reseed to any smallest number

DBCC CHECKIDENT(‘Id_Table’, RESEED)      —- Reseed without providing any seed value

Reseed the table to Zero and then just execute the DBCC command without any seed value and it will reseed the Identity value to next highest available Identity value. You do not need to truncate the table to reseed.

Even though the solution has fixed the problem, however, it keeps recurring.

I had another chat with my colleague at work. He said he has seen this before and provided me with the fix.

The fix is to insert the default records (where the UIDs are -1, -2, -3) first then load the records from the source into the destination table in the SSIS package. UID = -1 is unknown, -2 is no value and -3 is invalid.

Read Full Post »

I am working on updating one SSIS 2012 package to populate missing data from source to destination for a client. I received access denied error on package execution complaining about connection managers. The password for each connection manager is specified in the Project.params (i.e. parameters at the project level).

This error is very misleading. I granted myself a full control access to the file but the error remained.

Luckily my colleague pointed out to me that the package needed to be rebuilt first. This is indeed the fix i.e. the package has to be rebuilt before execution. I honestly have not seen this in SSIS 2005 and 2008R2.

Capture


Read Full Post »

My colleague asked me this morning how to debug an SSIS package to see the value of a variable at run time. His SSIS package contains many control flow components that are contained in one sequence container. We then set a breakpoint against one component within this sequence container and then executed the sequence container. We expected to see the variable value under the “Locals” window but we saw none. That was really odd.

I then came back to my desk to play further. My finding is that the breakpoint does not work within a sequence container.  You will only get to see the variable values if the “package” is executed. So if you have components contained in a few nested sequence containers, disable the ones that are not of your interest before you start debugging.

Tested this in both BIDS and SSDT against SSIS 2008R2 and 2014.

The following screenshot shows the value of the User::TodaysDate variable under the Locals window when a “package” is executed.

SSIS debug tool

The following screenshots shows nothing under the Locals window when the “Sequence Container” is executed.

SSIS debug tool against a sequence container


Read Full Post »

In the fuzzy lookup transformation, I have set it to generate a new index, store it and maintain the stored index.

fuzzy_lookup

When I reran my SSIS package, it threw an error below:

[Fuzzy Lookup [462]] Error: SSIS Error Code DTS_E_OLEDBERROR.  An OLE DB error has occurred. Error code: 0x80040E14.
An OLE DB record is available.  Source: “Microsoft SQL Server Native Client 10.0”  Hresult: 0x80040E14  Description: “A .NET Framework error occurred during execution of user-defined routine or aggregate “sp_FuzzyLookupTableMaintenanceInstall”:
System.Data.SqlClient.SqlException: Maintenance trigger already installed on this reference table.

To resolve this, recreate your destination tables used to store the output of the fuzzy process and drop all tables that were generated during the fuzzy process into the SSIS control flow task.  Also make sure that a TABLE is used as the reference table not the VIEW even though it allows you to select a view. If you still get the same error, rename the index and rerun the package.

The script below drops all tables that were generated by the Fuzzy Lookup stored procedures:

DECLARE @SQLTable AS TABLE
( i   INT
,SQLStatement NVARCHAR(MAX)
)

INSERT INTO @SQLTable
SELECT i = ROW_NUMBER() OVER (ORDER BY (‘DROP TABLE ‘ + TABLE_SCHEMA + ‘.[‘ + TABLE_NAME + ‘]’))
,’DROP TABLE ‘ + TABLE_SCHEMA + ‘.[‘ + TABLE_NAME + ‘]’ AS SQLStatement
FROM INFORMATION_SCHEMA.TABLES
WHERE TABLE_SCHEMA IN (‘dbo’)
AND TABLE_NAME LIKE ‘%FuzzyLookupMatchIndex%’
OR TABLE_NAME LIKE ‘%tg_DataCleaningMaintenance%’
DECLARE @i AS INT = 1
,@RowCount INT
,@SQLStatement AS NVARCHAR(MAX)

SELECT @RowCount = COUNT(*)
FROM @SQLTable

WHILE @i <= @RowCount
BEGIN
SELECT @SQLStatement = SQLStatement
FROM @SQLTable
WHERE i = @i

SET @i = @i + 1

PRINT @SQLStatement

EXEC sp_executesql @SQLStatement
END

An example of the fuzzy lookup data flow in SSIS

fuzzy-lookup-setup-in-ssis-2016

Read Full Post »

I honestly don’t remember that I need to run SQL Server Management Studio (SSMS) as Administrator to connect to the Integration Server 2008R2. However, this has changed in both SSIS 2012 and SSIS 2014.

I have a laptop running on Windows 7 and SSIS 2014. I need to run SSMS as Administrator to connect to the Integration Server 2014. Why? Below is the error that I get when trying to connect as me, even though I am part of the Administrators local group.

SSIS 2012 and 2014 access error via SSMS

To resolve this issue on Window 7:

1. You must be part of the Distributed COM Users group.

Go to Control Panel > User Accounts > Manage User Accounts  and then select the Advanced tab. Under the Advanced User Management, click on the Advanced button. Under the Local Users and Groups, select Groups and then select Distributed COM Users group. Add your username or Users group into this group.

Add user into Distributed COM Users group

2. Allow remote connection to the Integration Service on DCOM Config.

Go to Control Panel > Administration Tools > Component Services. Navigate to Computer folder > My Computer >DCOM Config. Locate either MsDtsServer100 (for SSIS 2008R2) or Microsoft SQL Integration Services 11.0 (for SSIS 2012) or Microsoft SQL Integration Services 12.0 (for SSIS 2014).

Right click on the item and then select Properties. Select the Location tab and tick the “Run application on this computer” option.

DCOM Config - enable running the application on this computer

3. Select the Security tab and then under the Launch and Activation Permissions, select the Customize option and then select the Edit button.

DCOM Config - allow remote access

Add your username or user group and then tick local launch and local activation. Tick remote launch and remote activation if the server is located on a different server.

DCOM Config - Allow local launch and local activation

3. Select the Security tab and then under the Access Permissions, select the Customize option and then select the Edit button. Add your username or user group and then tick local access and remote access.

DCOM Config - Allow local access and remote access

4. Restart the SSIS service (this is very important as changes will not be applied without a restart).

5. Test connecting to the SSIS via SSMS.

6. Note: Connecting to SSRS via SSMS will work too once the above configuration is applied.

Read Full Post »

I have an SSIS package that gets today’s date and then stores it into a variable of date data type. I then have another Execute SQL Tasks that takes in this date variable value and returns with some values. When the date is set to 2012-10-04 (4 October 2012), somehow it gets interpreted as 2012-04-10 (10 April 2012). This of course will return incorrect output.

To overcome this, I change the variable data type from date to string and its SQL statement to below so that it will have this format e.g. Nov 27 2014  3:12PM.

SELECT CONVERT(VARCHAR, CAST(GETDATE() AS DATETIME), 100) AS [Date]

This has worked like a charm! 🙂

Read Full Post »

I have an SSIS package that is set up to only send an email when the variable of String type has values. If this variable is empty, then don’t execute the SendMail task.

I first used the following precedence constraint expressions, which check if the FinalResults variable is not empty. The FinalResults contains the email message. So when it has values, send the email out, otherwise, do nothing.

@[User::FinalResults] != “”
!ISNULL(@[User::FinalResults])
ISNULL(@[User::FinalResults]) == FALSE

precedence constraint in string

Unfortunately, the above expressions don’t work. I resolved to change my stored procedure to obtain the number of records returned. When there is no value, the number of records will be zero. I then use this as my precedence constraint instead. This has worked perfectly 🙂

@[User::TotalRecords] > 0

precedence constraint in integer

Read Full Post »

SendMail task only supports rending the email message in plain text. Adding CHAR(13) into the message in SQL only works if you are using Office365 email client (where the default body text formatting is in HTML). When this message is open in Outlook, it’s rendered in plain text.

I need to display an email message that looks like below to list each vessel as a separate line.

_______________________________________
From: target365@email.com

Sent: Wednesday, 26 November 2014 11:59:56 AM (UTC+08:00) Perth
To: chinchin@email.com

Subject: Target 365 Achievement on 4/10/2012

Vessel A has achieved a Perfect Year
Vessel B has achieved a Perfect Quarter
Vessel C has achieved a Perfect Year
 

As you see from the syntax below, I have added CHAR(13). This CHAR(13) will be rendered in &#x0D ;, which needs to be replaced back with CHAR(13) to get the correct result.

— Email content (variation 1)

SELECT Results = REPLACE(Results, ‘&#x0D ;’, CHAR(13))

FROM

(  SELECT DISTINCT

                  (  SELECT ClassValue + ‘ has achieved a ‘ + Reward + CHAR(13)

                     FROM #Ranking

                    WHERE RewardDate = CAST(@Date AS Date)

                    AND Ranking = 1

                    FOR XML PATH ( )

                 )  AS Results

 FROM #Ranking

 WHERE RewardDate = CAST(@Date AS Date)

 AND Ranking = 1

) sub

In order to have it rendered in HTML in the normal Outlook, the SendMail task no longer can be used. A Script task is used instead. To use the Script task, the above SQL needs to be modified to include the html tag of  <br />. The message needs to contain this tag. Again, it is first rendered in &lt;br /&gt; which then replaced back with <br />  to get the correct result.

— Email content (variation 2)

SELECT Results = REPLACE(Results, ‘&lt;br /&gt;’, ‘ <br /> ‘)

FROM

( SELECT DISTINCT

                  ( SELECT ClassValue + ‘ has achieved a ‘ + Reward + ‘<br />’

                     FROM #Ranking

                     WHERE RewardDate = CAST(@Date AS Date)

                    AND Ranking = 1

                    FOR XML PATH ( )

                  ) AS Results

 FROM #Ranking

 WHERE RewardDate = CAST(@Date AS Date)

 AND Ranking = 1

) sub

Next, create 4 variables in the SSIS package i.e. SendMailFrom, SendMailTo, SendMailSubject and SendMailMessage. SendMail variables

Next, edit the Script task and assign the 4 variables as read-only. Script Task for SendMail read only variables

Next, edit the C# code of the Script task add

using System.Net.Mail;

and then add the code below into the Main function:

public void Main() {

// Storing SSIS variables in .Net variables.

String SendMailFrom = Dts.Variables[“SendMailFrom”].Value.ToString();

String SendMailTo = Dts.Variables[“SendMailTo”].Value.ToString();

String SendMailSubject = Dts.Variables[“SendMailSubject”].Value.ToString();

String SendMailBody = Dts.Variables[“SendMailBody”].Value.ToString();

// Get SMTP Server from SMTP Connection Manager.

String SmtpServer = Dts.Connections[“SMTP”].Properties[“SmtpServer”].GetValue(Dts.Connections[“SMTP”]).ToString();

// Create an email and change the format to HTML

MailMessage myHtmlFormattedMail = new MailMessage(SendMailFrom, SendMailTo, SendMailSubject, SendMailBody); myHtmlFormattedMail.IsBodyHtml = true;

// Create a SMTP client to send the email

SmtpClient mySmtpClient = new SmtpClient(SmtpServer);

mySmtpClient.Send(myHtmlFormattedMail);

// Close Script Task with success

Dts.TaskResult = (int)ScriptResults.Success;

}

Build the code and then test it.

My SSIS packages using SendMail task and Script task are shown below.

Using SendMail task (email message is always rendered in plain text): Send Mail in Plaint Text

Using Script task (to render the email message in HTML): Send Mail in HTML

Read Full Post »

Older Posts »